Introduction to Git
If you ever created a longer document (bachelor or master thesis perhaps) you know it is a good idea to have multiple versions of your document to get comments and have it reviewed or also to have a backup just in case.
That is even more true if you have not one but several documents and if you want to collaborate in a team to create such documents.
As you are probably here because you will start to create and/or work with data in a text or even XML format in a team we want to introduce you to a tool that has been in wide spread use among software developers now.
- It solves the problem of keeping versions of text documents in sync among sometimes thousands of collaborators working on a software product.
- It helps integrate changes by multiple collaborators and also solve situations where two people edit the same part of a document.
In the following how-to we want to show you
- how to get and install the software you need
- how to get the data from a “repository” that was set up for your team
- how to change a file and upload it again
- what to do when two people change the same data
Why use Git in Digital Humanities?
As knowledge workers, we constantly create and edit content, change a document, save it, change it again, share it with colleagues, etc.
Git is a free and open-source “version control” software, which can help that process by:
- tracking changes, and versioning content and code
- fostering collaborative work, with diffing and conflict resolution, as well as clear attribution
Git works best when used with plaintext file formats such as source code, XML/TEI documents or
Markdown content (you will see that in an example document later and this how-to is actually written
in Markdown). While Git will happily store images, or .docx and .pdf documents,
it was not designed to help you with changes in those kinds of documents. Nevertheless if a
software knows how to show differences there is a chance that git can be used together with it.
Microsoft Word is such a software for example.
Git can store audio files or big images like scans and facsimile but there are better tools for that.
To make your self familiar with the terminology used in the further sections please read this text.
Setting up the software needed to use Git version control
As Git is more popular amongst software developers it is available for every
Using Git for collaborative team work
In this section we’ll look at using Git to manage files in a project that is being worked on by more than one person as this is the most likely reason why you might be asked to use Git.
This involves synchronizing changes across computer networks, and resolving conflicts between document versions that can arise when two people have changed the same document in different ways.
Many “drive” services in the cloud like https://ucloud.univie.ac.at, https://www.dropbox.com, https://onedrive.live.com/ or https://drive.google.com” provide such mechanisms in their Web interface as well. Git however is often more fine grained and stricter.
It is often easier for programs to interact with Git services then with “drive” services. That’s why software developers often ask you to use Git instead of any “drive” service.
If you get into the Git workflow you may want to use it also locally for any kind of documents (remember Git is best at text documents, but not limited to them).
If you have not done so, we recommend you read the paragraph on Git terminology in the terminology text.
Starting our editor with add-ons: Visual Studio Code
Cloning a remote repository
In many research projects, setting up a remote repository will be one of the initial steps. We can clone a remote repository, which will take care of initialising the project locally, connecting it with the remote, and synchronising the local project with the current state of the remote.
Getting a throw away password for Git: Creating an access token
Security experts will tell you that you should never save a password on a computer. Write it down on a peace of parper and put it into a locked drawer maybe but never save it to a computer in a readable way.
This of course can mean that you need to type a password again and again and again when working with some data and that is tiresome.
So the solution are throw away passwords no one needs to remember and that have a scope, that is they can only be used to do certain things with a service.
Besides gitlab.oeaw.ac.at allows you to use a number of other services (like Google, GitHub, etc) you already might have an account for to log into gitlab.oeaw.ac.at. If you use that, and that is in general a good idea, gitlab.oeaw.ac.at has no idea what your password is. It just trusts the other services to check your password and tell it that you are who you claim to be.
So to get our data from gitlab.oeaw.ac.at we need to create a password for exactly that purpose. This is called an “access token”.
Go to gitlab.oeaw.ac.at and sign in.
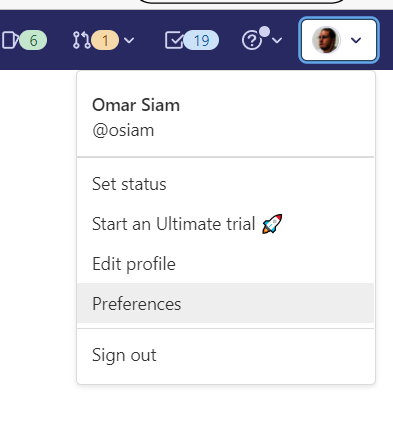
In the top right corner you see your user settings menu. Open it and choos preferences.
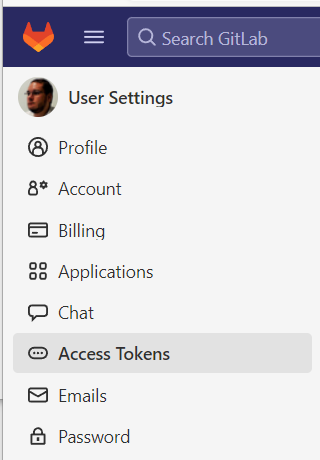
On the left side select “Access Tokens”
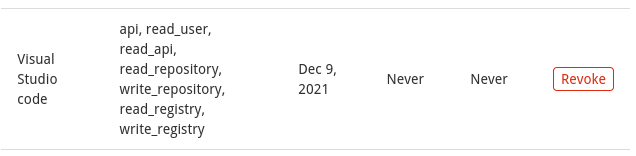
We sill create a new access token that has all available rights or scopes so Git and Visual Studio
Code can interact with gitlab.oeaw.ac.at. We enter a descriptive Token Name like Visual Studio Code or Git
and add a name for the computer we will use this on. This is a hint for us for later.
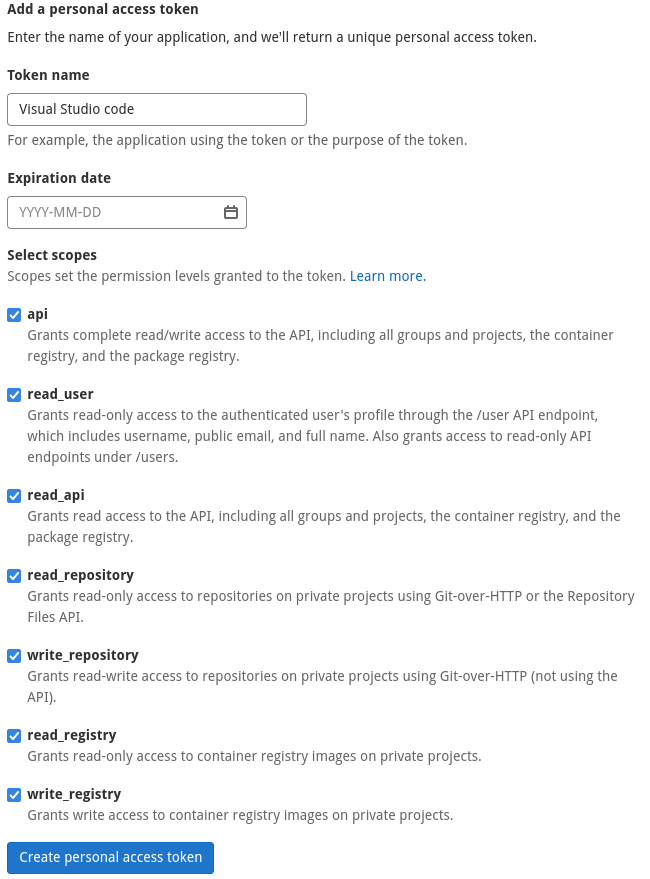
We could only grant a particular set of rights here, limit the scopes the token is valid for. We can also set an expiration date if we know we wont use the token for very long, for example when trying some new software.
After we click on Create personal access token! we see this new generated password in our browser.
As the text clearly states we wont be able to see it again. If we need access for another tool we
just create a new access token.
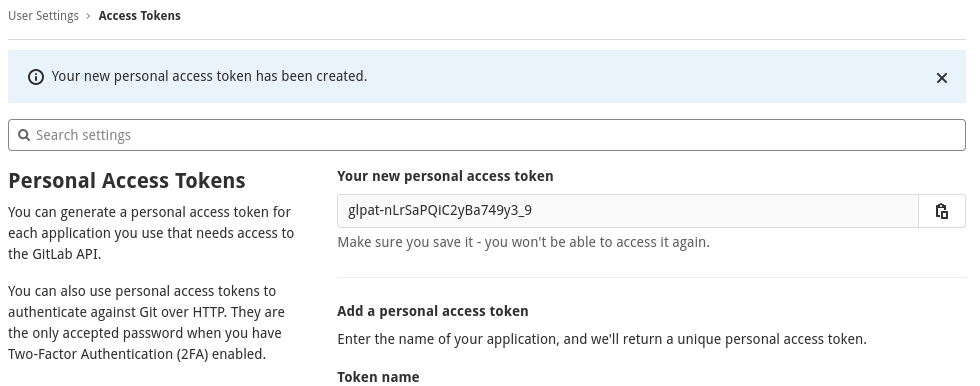
For the purpose of this workshop we should leave the browser tab open or copy the access token we just created somewhere. We might need it later for enabling an add-on.
If we ever forget what the prupose of a token was or if we don’t use it anymore we find the token
by name and Revoke it, we delete it.
Getting some data for this workshop
For example we want to clone wboe-artikel from https://gitlab.oeaw.ac.at/acdh-ch/wboe.
The data at this location, in this repository, is marked as private. So you need to log into gitlab.oeaw.ac.at
with the account you set up to see the contents.
On the top right there is a Clone button which, when clicked, gives you two options Clone with SSH
and Clone with HTTPS. We need the HTTPS option. On the right there is a copy to clipboard button we can use.
If you installed Visual Studio Code there is a special kind of link that will open Visual Studio Code if you allow it and start the cloning process with the right settings.
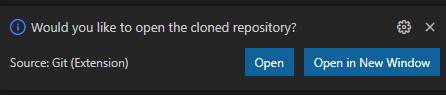
At the end there is a little dialog in the bottom right corner, click open there:
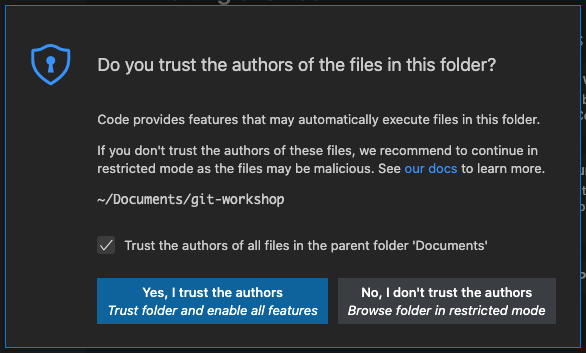
Because Visual Studio Code is a development environment where developers execute code they just downloaded from somewhere on the internet, Visual Studio Code asks if we trust the current repository. For one we do trust our collaborators I think and then we work with data repositories that contain little or no executable code. So we decide to choose trust here.
See here for the command line.
Tracking changes
Let’s start by looking at how Git can help with tracking changes in a project.
Most of us will have encountered, and used, some kind of version control: either some custom file naming convention to mark versions of a document, change tracking functionality built into word processors, or the history view of document edits on Wikipedia.
Git can record which changes, to which documents, have been made when, and by whom. It allows to keep a detailed revision history of a project, because it can save snapshots of a project at specific points in time, thus being open to review any time in the future.
Version control allows to save versions of content, restore previous versions, and compare different versions. This is especially beneficial when working with multiple documents, and when working in teams of more than one (potentially working on the same document).
Let’s look at how change tracking with Git works in practice, locally in the project on your computer, which is always the first step when trying to upload a change to the server.
Lets open the README.md in Visual Studio Code. This is done while the uppermost mode on the left is selected (the two sheets, files)
We want to change something so we replace the text about adding a good description with Done.
Now we can select the third mode from the top (three connected circles, the graph changes and branches make up in version control)
This only lists those files that we change since we last made our changes permanent, committed (to) them. The README.md is listed. If we double click it we get the following view:
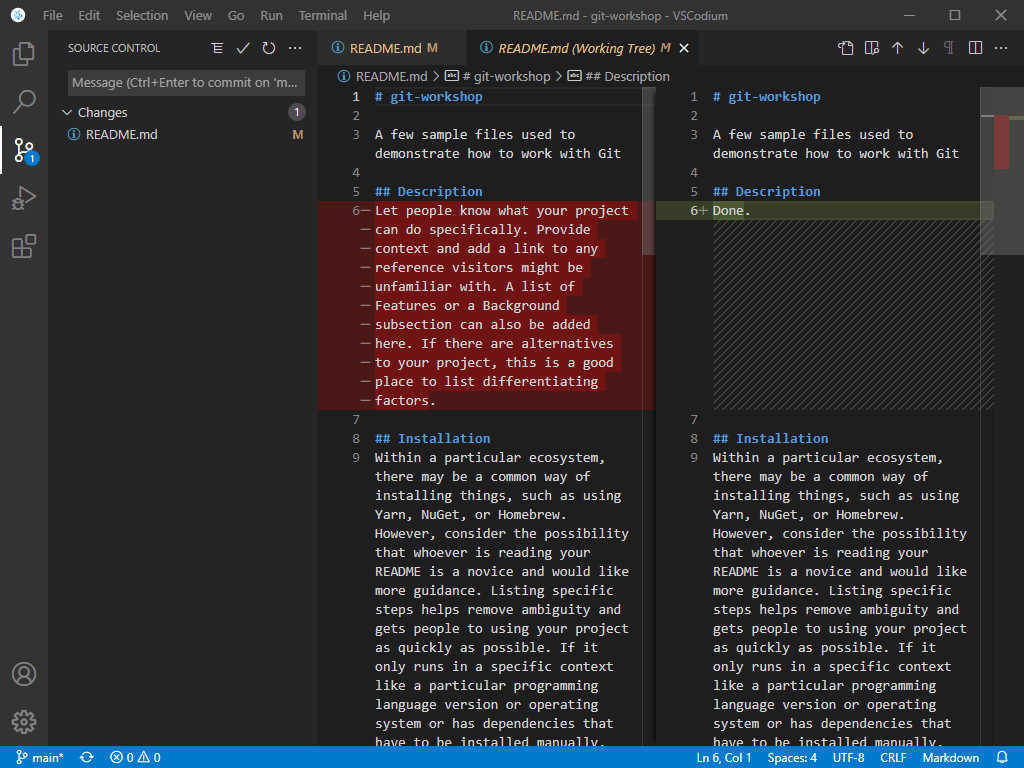
If we are not 100% sure about the changes we will now “stage”, that is prepare to be “commited”, we can open each file and see the differences per line. This might also give us a hint what we did if the last commit was a while back and we don’t remember exactly what we did.
Mark content changes to be included in the version history
Let’s tell Git to keep an eye on changes to the newly created document README.md:
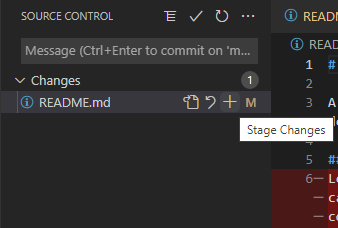
We put changes in a “holding zone” or “staging area”
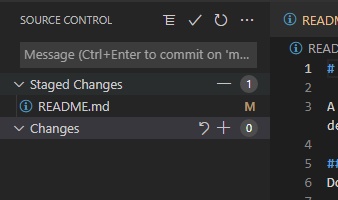
See here for the command line.
Bundle changes into meaningful chunks and commit to them
Including content changes in Git’s version history involves a two-step process. First, we put changes in to the “staging area” (this is what we did with git add). We can continue adding related changes to other documents, or additional newly created documents. This allows creating semantically meaningful units of changes. But the changing a staged document will not propagate these changes in the next step. Keep that in mind.
When all related changes have been added to the “staging area”, we can save them together as a version history snapshot, with a message that briefly describes why we did the changes so it is easy to understand them later when viewing the version history.
These units are called “commits”, and “committing” means permanently recording a snapshot of contents at a specific point in time, with a message describing the change:
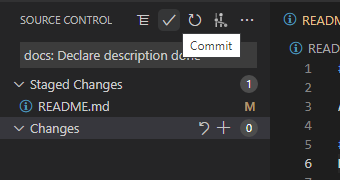
Every project snapshot we commit to history should include a semantically meaningful set of changes, and this may involve edits to different documents. Visual Studio Code allows us to granularly choose with the + which changes, to which files should be part of the next snapshot, while “commit” will label that set of changes, and actually save a new snapshot.
The very first commit error
If you are on a new machine and/or just installed Git you will get an error. Here is how it looks in MacOS:
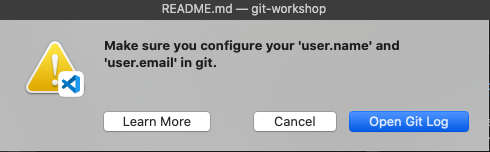
or Windows:
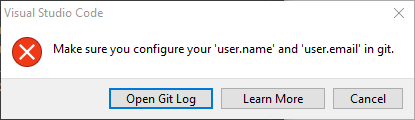
Whether you use Learn More or Open Git log you will eventually see that Git just wants to know
who committs here. We suggest to use Open Git log which shows a new set of controls at the bottom right.
Alternativly you can select “Terminal” and “New Terminal” from the menu bar

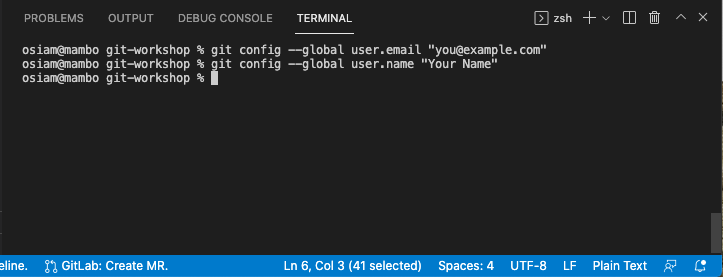
There is no graphical interface for this most often one time configuration. You need to copy the two suggested commands and execute them in a terminal. Visual Studio Code provides one. So click on “Terminal” at the bottom right.
Now replace you@example.com and Your Name with your name and execute two commands to configure Git.
You can copy the commands from above.
See here for the command line.
Keeping repositories in sync: fetch, pull, push
To get our changes to the server so other people in our team can fetch them to review them for example
we now push what we committed on our machine to the server.
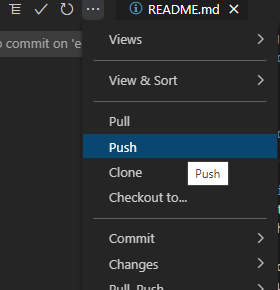
The opposite action is to pull from the server. This means getting all the changes accumulated there
and integrating them (merging them with our local changes if any) in the files we see locally.
If we just want to download all change not integrating them at the same time we fetch from the server.
See here for the command line.
Merging and conflict resolution
What happens if two people edit the same file? Well it depends:
- If the two edit different lines in the file then the changes can be
mergedautomatically That is a good solution in the majority of cases and it saves a lot of time. - I two people edit the same line then there is a
conflictthat needs to beresolved
Conflicts are marked with these distinct lines
<<<<<<<< ...
One change
--------
The other change
>>>>>>>> ...
Note that Visual Studio Code provides us with a few controls we can click to resolve the conflict.
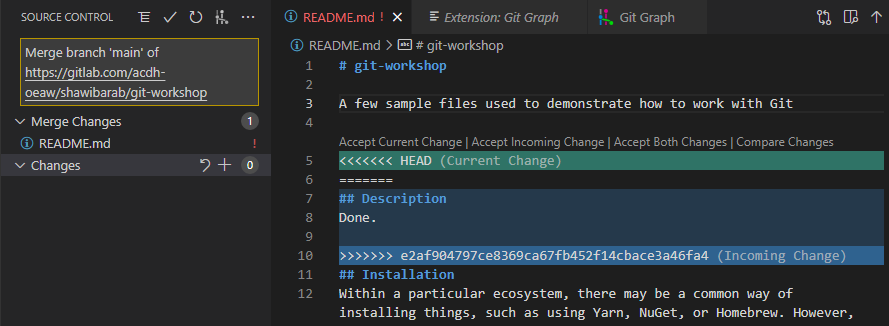
We now can decide which is the better change (or use both if applicable):
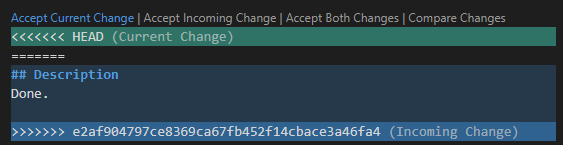
And after resolving all the conflicts we do a merge commit (the text is there automatically)
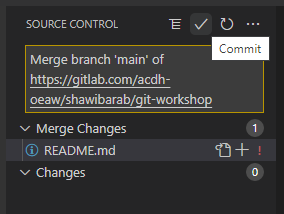
Note: Never commit before resolving all conflicts, removing all conflict markers. You will make the maker lines permanent and They are made like this to break any programming language and XML.
View history of changes
Time travel
Recommended Visual Studio Code add-ons
Visual Studio Code can be used to efficiently edit numerous types of text files. Among them XML and TEI/XML or Markdown. To make editing comfortable we install add-ons. These are the ones we would recommend righht now so you can use Git with the data files we create and edit.
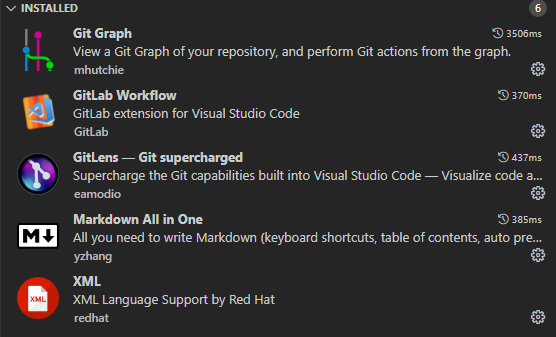
- GitLab Workflow Shows additional information like issues assigned to you which you need to solve or the status of the build pipeline
- Git Graph Shows a graphical representation of who changed what and also all the commit messages. Useful if you hace to find out who changed what and why
- Markdown all-in-one Makes creating Markdown documents such as the README.md example or this how-to more comfortable Contains a preview that you can open on the right side next to the text document
- XML (by redhat) Helps you if you need to make (small) changes in the TEI/XML documents ww produce in other applications.
- GitLenses Is also useful if you hace to find out who changed what and why
Bonus: Other editor integrations
If you like to work with Git via a graphical user interface, take a look at this bonus section, which lists some popular editor integrations.